In the first part of this series, we explored two best practices with JavaScript: declaring variables and immutable programming with objects. Next, the series will transition to some best practices with React.
These best practices will focus on working with data with the React Components props, and we will take a deep dive into props and state. Having a good grasp of JavaScript and component design principles is a must to fully understand the real and conceptual limitations placed on data within React components.
Let’s dive in.
Best Practice #3 – Props and State
When working with React Components, it’s important to understand how to work with props and state correctly. I tell my students that using props and state incorrectly may result in the million-dollar bug. “Million-dollar” bugs are the ones which are not caught with developer tooling or normal testing, but are present and unexpectedly appear in production causing great trouble for users and developers. Typically, they results in the loss of lots of money due to unhappy customers, developer debugging time and the deployment of patch releases. Why? The UI is the most important part of an application. It’s the part of the application with which the user interacts. UI bugs can greatly shake user confidence in the other capabilities of the application. Concerning props and state, JavaScript will allow you to use these objects improperly and React cannot prevent it. Catching these mistakes during testing or code reviews may eliminate bugs later. Therefore, proper training and understanding are critical to correctly writing React applications.
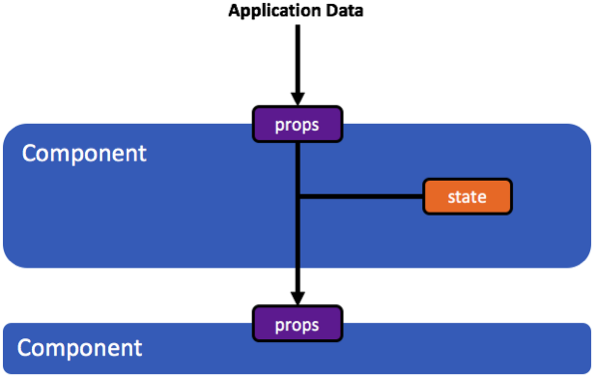
First, let’s examine props. A component’s props are the data supplied to it by a parent component or the surrounding environment. These props are available on the props property of the component instance.
const message = 'Hello World';

// pass the message into the component
<ShowMessage message={message}/>

// the ShowMessage component referenced on the previous line
class ShowMessage extends React.Component {

  render() {
    // access the message passed in via props
    return <span>{this.props.message}</span>;
  }
}
The component’s props property is not read-only, therefore, it can receive new props from its parent component. The props object referenced by the props property on the component is frozen by React using JavaScript’s Object.freeze function (this call is deep within the React source code and is called when a component processes its incoming props) . A frozen object cannot have new properties added nor its existing properties removed. Additionally, this freezing prevents the props from being mutated.
render() {

  // outputs true to the console
  console.log(Object.isFrozen(this.props);

  // throw an error
  this.props.message = ‘New Message’;

  return <span>{this.props.message}</span>;
}
The props object of a component and its object tree should never be mutated. Mutating the props object itself is prevented by the freezing of the props object. Nevertheless, the restriction on mutation does not end with only the props object. Rather, the restriction applies to all objects accessed via props (the entire tree of objects).
For many reasons, the other objects cannot be frozen to restrict mutation. Because they cannot be frozen, JavaScript will allow them to be mutated, and there is nothing React can do to prevent that mutation. Therefore, it’s on the developer to never mutate them. The question is why can they not be mutated?
The usual example I give is a person’s paycheck from work. All employees receive paychecks and can spend the money they earn however they wish. However, the actual amount of the paycheck is controlled by their employer. The amount received cannot be mutated, not because paychecks can never change, but because of the employee’s relationship to their paycheck amount, which the employee can never change (never mutate it). For the employee to change it to a larger amount would be stealing.
For this same reason, components cannot change their props. The data (especially objects) passed through props are managed by something external to the component. If a component were to change the data, that would mean changing the data managed in another scope, like the employee changing their paycheck amount. While the component cannot change its props, it is free to use the props unchanged however it wishes, just like the employee can spend their check however they wish. Components can use their props to display UI content, or they may pass them down to their own child components in the component tree.
Just like props, a component’s state has its own rules. A component’s state represents data managed by that component, and it can be mutated. Both the state property and the object tree to which it points can be mutated if that same object is not accessible via props. Ignoring the larger discussion of whether components should have local state (this is a much larger and controversial topic), let’s examine the rules on how components should work with their local state when they do possess it.
When working with React components, the component’s state is initialized in the constructor when the component is first instantiated. A component’s state is an object (including the tree of objects that proceeds from it) accessed via the state property on the component instance. The only time the state property should be directly assigned is in the component’s constructor. After the constructor executes, and the state is initialized, the state property will never again be reassigned by the component’s implementation.
class SimpleForm extends React.Component {

  constructor(props) {
    super(props);

    // initializing the state in the constructor
    this.state = {
      message: '',
    };

    this.onChange.bind = this.onChange.bind(this);
  }

  // … omitted …
}
Instead, all state updates must be accomplished via a call to the component’s setState function. The setState function will update the object assigned to the component’s state property immutably, triggering a re-render of the component.
class SimpleForm extends React.Component {

  // … omitted …

  onChange(e) {
    // changing the state with setState
    this.setState({
      message: e.target.value,
    });
  }

  // … omitted …
}
At a lower-level, React allows both the state property and the object reference by the state property to be mutated. To accomplish state changes, the state property must be mutated through the assignment of a new state object. Calling setState assigns the new state object.
While allowed, mutating objects on the state object tree it is not recommended. Instead, the objects on the state object tree should always be updated immutably. These immutable updates help to improve performance through more efficient change detection and help prevent accidental mutation of objects that may be accessible through state and props.
To summarize props, state, and the rules regarding mutation from the developer’s perspective within a component’s implementation:
The component’s props property is immutable and the immediate object (known as the props object) to which the props property points is immutable.
The tree of objects that expands from the props object’s properties is immutable.
The component’s state property can only be mutated through calling setState where a new state object is produced based on the property values of the current state object and any new/changed values are passed into the call to setState.
The tree of objects that expands from the component’s state object’s properties can be mutated, but ideally should not be to have better performance when performing change detection.
Concerning the last summary point, immutably updating objects accessed via state enables the use of React’s Pure Components and the change detection performance enhancements discussed earlier. General rules on the placement of pure components and leveraging immutable programming for change detection are covered later in the series.
Another important consideration is the passing of a parent component’s state to a child component’s props. Returning to the example of the employee paycheck above, while the employee may not change the amount, the employer may. From the perspective of the employee, their paycheck amount is props. From the perspective of the employer, their paycheck is state and as such can be mutated (hence, a pay raise).
class SimpleForm extends React.Component {
  // … omitted …

  render() {
    // the state from SimpleForm is passed as props to the input component
    return <input type="text" value={this.state.message} onChange={this.onChange}>;
  }
}
Data itself is never inherently props or state; rather, the component’s relationship to the data determines whether the data is props or state.
Note: Understanding the difference between something inherently possessing a quality and a quality being the result of a relationship is critically important. All people are inherently human, but all humans participate in many relationships with other people. The same person is a parent to one person, the child of another person, and the employee of another.
The terms props and state represent the relationship between the component and the data. With each relationship comes certain relationship qualities. For props, the quality of the relationship is that the data is immutable. For state, the quality of the relationship is that the data is mutable. Regardless of the relationship, the data itself is not inherently mutable or immutable. The rules of props and state only govern the relationship.
There are many conceptual principles and practical considerations that come into play when using data with components. Having a proper understanding of these issues and how they apply to the specific situations of an application is essential to effective React component development.
Best Practice #4 – Validating Props
When working with developer-created React components, it may appear obvious what props are required and what kind of data is needed to populate them. However, when working with more complex components, especially components not created by the developer or components which were created long ago, determining what props are needed and their data type is difficult. Reviewing the source code of a component is an inefficient and mistake-prone way of learning the props needed to use a component. Fortunately, Facebook provides a library known as PropTypes that can be used with React components to define the props of a component.
By using the PropTypes library, a component’s props can be defined as almost any kind of data type. Supported types include primitives such as strings, numbers, and Booleans, as well as object types including arrays and functions. A prop can be defined as being a function object, which is helpful for callback functions (functions that pass data back to a parent component). When working with props (they receive general purpose objects), both shape and object origin can be configured for type-checking. Shape refers to an object’s properties including the type of those properties.
Object origin refers to how the object was created. Objects can be created many ways: classes, object literals, parsing JSON, etc. Often in JavaScript, the object’s origin is irrelevant. Instead, the current shape of the object is what matters. When object origin is relevant, usually the class used to instantiate the object is what the type-checking is interested in. Typically, object origin is only important when the object is expected to possess certain behaviors (functions) implemented on it. Fortunately, the PropTypes library supports that as well. In addition to type-checking, props can be declared as being required or optional:
class ShowMessage extends React.Component {

  static propTypes = {
    // message is a string and is required
    message: PropTypes.string.isRequired,
  };

  render() {
    return <span>{this.props.message}</span>;
  }
}
React components support custom PropTypes validation functions as well. These custom functions are especially useful for validating sets of props. The built-in validation only validates a single prop. Often, it is desirable to validate a set of props based upon their combined values. Using custom validation functions makes this possible.
static propTypes = {
  // example of a custom string required
  message: (props, propName, componentName) => {
    if (props[propName] == null) {
      return Error(`${propName} is required`);
    }
    if (typeof props[propName] !== 'string') {
      return Error(`${propName} should be a string`);
    }
  }
}
Validating props through type-checking can impact the performance of an application. Also, when validation fails, warning messages are written to the browser’s console window. While the type-checking and warning messages are desirable during development, they need to be suppressed in production. Users need the fastest UI experience possible, and extraneous console warning messages only confuse curious users who happen to discover the developer tools built into the web browser. In short, it’s too late to fix prop validation errors in production, so there is no need to burden the system with their validation and associated error reporting. Therefore, the PropTypes checks an environment variable to determine if it is set to “production.” If that is the case, the type-checking validation is skipped which speeds up the components and prevents the warning messages from being displayed on the console.
Conclusion
In this post, we explored some best practices concerning data and React components and examined the role of props and state within a React application.
Assisting the correct reusability of components, PropTypes provide valuable information on the props needed for a component and their data types. Using data properly within React components is critical to the success of any React application.
In the last post of this series, we will explore best practices regarding the structure of components trees and managing state with MobX. Do you have any best practices from your experiences? Do you disagree with any of the practices listed in this blog post or the previous post in this series? If so, please tell us in your comments below.
Eric is a professional software developer specializing in HTML, CSS, and JavaScript technologies. He has been developing software and delivering training classes for nearly 19 years. He holds the MCSD Certification for ASP.Net Web Applications, and is a Microsoft Certified Trainer.