Django is a Web framework like Rails, Spring, or ASP.NET MVC, but for Python. Using Django, you can quickly develop a Web application whose data (models) is stored in the database of your choosing, using templates for page views, and simple Python functions for controllers.
This blog outlines how to put together a complete, working (though minimal) Django website in 10 easy steps.
Note: the commands and code in this blog assume that Django is already installed on your computer. See Django’s home page, https://www.djangoproject.com/, for how to do this.
Django in 10 steps
Generate a Django project
Generate a Django app
Add the app to the installed apps settings
Write the models
Migrate the database
Use the admin interface to add some data
Create a template for the page view
Code a view function
Map a URL to the view
Run the development server and enjoy the app
Step 1: Generate a Django project
To get started, use the provided django-admin script to create a new Django project:
django-admin startproject blog_example
This creates a project folder named “blog_example” with database, Django, and application settings. One project might consist of several applications that work together to implement a web site. Note that there is a nested folder with the project name for the site settings. The only file in the project folder is manage.py, which is the project-specific admin tool. The layout of the project so far is this:
We’ll use the default database, SQLite; you could edit settings.py in the project folder to use PostgreSQL, MySQL, or Oracle.
The built-in authentication and admin modules need access to the database. We’ll set this up with
python manage.py migrate
Step 2: Generate a Django app
Now we’ll generate our application. This will be an app that displays US States and their major cities. To create an application, we'll use manage.py again:
python manage.py startapp stateinfo
This creates a new folder (really a Python package) for the application, under the main project folder. Now our layout looks like this:
Step 3: Add the app to the installed apps settings
Because Django is a framework, we let it organize our code for us. The only manual configuration needed at this point is to add our application to the project configuration. In blog_example/settings.py, add the following line to the INSTALLED_APPS tuple:
'stateinfo',
Step 4: Write the models
Our data will be stored in models, which are Python classes that map to database tables, using Django’s built-in Object Relational Mapper, or ORM. The model is the key to Django’s power; it describes everything about your data, so Django can automatically manage the database.
Models go in models.py in the app folder. For this app, we’ll create two models, State and City. Each state is associated with multiple cities, so we will use a foreign key to implement a one-to-many relation:
from django.db import models

  class State(models.Model):
    name = models.CharField(max_length=100)
    def __unicode(self):
      return self.name
  class City(models.Model):
    name = models.CharField(max_length=100)
    is_capital = models.BooleanField(default=False)
    state = models.ForeignKey(State)
    def __unicode(self):
      return self.name
Django supports a wide variety of field types. Tables can have a one-to-one, one-to-many, or many-to-many relationship, among others.
Step 5: Migrate the database
Once the models have been created, it’s time to build the database. Django uses migrations to keep track of changes to the database schema. When the database is created, and whenever you make a change to the models, you will need to migrate the changes:
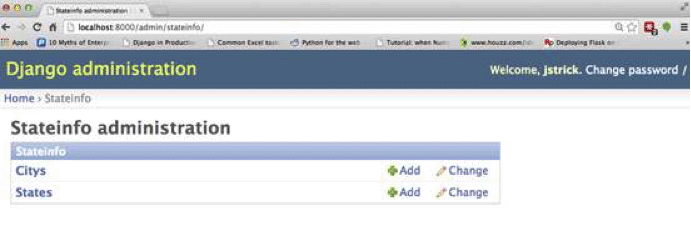
One of the really useful features of Django is that it automatically creates an admin site for your data. To set this up, add your models to the admin.py configuration file in the app folder:
from stateinfo.models import State, City
  admin.site.register(State)
  admin.site.register(City)
To access the admin site we need a username and password:
python manage.py createsuperuser
Django provides a built-in web server for development. Start it up with:
python manage.py runserver
Open a browser and go to http://localhost:8000/admin. Now you can add some states and cities. Note that a state must be created before you can add a city to it. You can use the + button to add a new state from the City admin form.
You can update your models to provide plural forms for classes/tables and other human-friendly data.
Note: do not use the built-in server for production applications
Step 7: Create a template for the page view
Now that you have some data in the database, you can display the data in the application. While you can return raw HTML from a view function, it is better to use templates for views. Templates are HTML files that contain Django placeholders, which will get filled in with data from the models.
Placeholders come in two flavors: {% %} surrounds code instructions, such as for loops and if tests; {{ }} contains variables.
The default location for templates is a folder named templates under the app folder, which is not created by default. Create the folder, then edit a file in that folder named states.html with the following content:
<!DOCTYPE html>
<html>
<head lang="en">
  <meta charset="UTF-8" />
  <title>{{ title }}</title>
</head>
<body>
<h1>{{ title }}</h1>
{% for state in states %}
{{ state.name }}
<ul>
  {% for city in state.city_set.all %}
  <li>{{ city.name }}
    {% if city.is_capital %}(capital){% endif %}
    </li>
    {% endfor %}
</ul>
{% endfor %}
</body>
</html>
Step 8: Code a view function
To provide data from models to the template, Django uses view functions. These are called “controllers” in other web frameworks. View functions expected a request object, and return web content. By default, views go in the file views.py, although this is not required. In this case, the returned content will be the filled-in template:
from django.shortcuts import render
from stateinfo.models import State

def states(request):
    vars = {
        'title': "My List of States",
        'states': State.objects.all(),
    }
    return render(request, 'states.html', vars)
The render function processes the template, using a dictionary of variables, and returns it to the caller (typically a web browser). In this example, the ‘title’ variable is just a string to display on the page, and the ‘states’ variable, is a list of all the State objects in the database.
Step 9: Map a URL to the view
Now that there is a template for the page, and a controller to fill it in, we need to tell our site where to find our app. This is done via URL mapping:
from django.conf.urls import patterns, include, url
from django.contrib import admin
from stateinfo.views import states

urlpatterns = patterns('',
    url(r'^admin/', include(admin.site.urls)),
    url(r'^$', states),
)
Each URL uses a regular expression to match an incoming request. The regex ‘^$’ matches a null string, so the states view will be called for the top level of the web site (http://localhost:8000/).
Step 10: Run the development server and enjoy your app
Now that the model, view, and template have been created, go to the main site (http://localhost:8000/) to see the data displayed. If the server is not running, start it up with
python manage.py runserver
Summary
To create a web application with Django, you define the models, views, and controllers, and let Django take care of the big picture. For real-life apps, Django provides form management, authentication, session management, error handling, and anything else needed for a scalable, enterprise-capable application.
Click HERE for a zip file with the entire project.
John is a long-time trainer of Accelebrate and has taught all over the US. He is a programmer, trainer, and consultant for Python, SQL, Django, and Flask.