We offer private, customized training for 3 or more people at your site or online.
While teaching a SharePoint 2013 Advanced User class for one of Accelebrate’s clients, a student asked me if it would be possible to create an Employee In & Out board using SharePoint. It seemed like a simple request, so that evening in the hotel, I started working on a solution. I quickly realized it was not as “simple” as I thought it might be. I kept running into the road block of how to tell SharePoint to update an employee record instead of creating a new one. I would also want to create a new entry if one did not already exist.
In this article series, I will teach you how to create the Employee In & Out Board using SharePoint lists, an InfoPath form, and a custom workflow. This three-part series will show you how to Create/Update list items using a workflow as well as how to do workflow lookups.
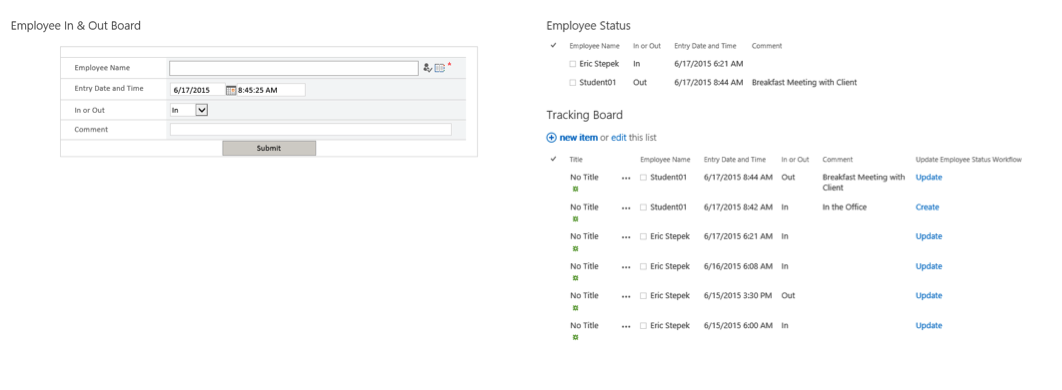
The final product will look like this:
To get started on the In & Out Board, we will create two SharePoint Lists:
- The first list will contain items added using a basic InfoPath form and will also be used as the “audit” log for the application.
- The second list will contain a single item per user. A workflow will run and either update an existing employee item or create a new item if the employee does not have a row in the list. This list will contain the status of each employee.
Information for Readers New to SharePoint
We will use a 2-step process to create lists, libraries, columns and site columns. This is the same 2-step process that I teach in all my classes and is considered a best practice.
The reader should have a basic understanding of SharePoint and how to navigate around the SharePoint interface. While my steps are detailed and do include pictures, I abbreviate some tasks because they are basic and used heavily through-out the articles. To help new users, I’ve included basic navigation terms below. If you are using SharePoint Online from a vendor or an on-premise installation, some of the UI elements may vary in location, color, or look.
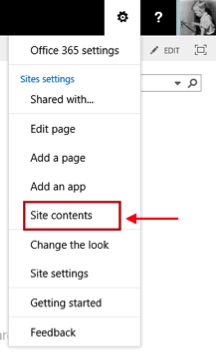
The GEAR: contains links to many of the common pages used in SharePoint including Site Settings, Add an App, and Site Contents. It is generally located in the upper right corner of the SharePoint UI, which I’ve shown below. This screenshot is from an Office 365 E3 SharePoint 2013 installation.
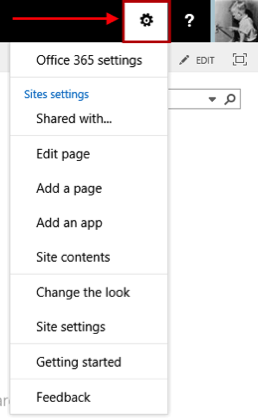
Site Contents link: on the Settings Gear and is where a complete listing of all apps included on your site. The Site Contents link is also on the left navigation (or Quick Launch), but I recommend you learn how to find it on the Settings Gear, as many companies remove this from the left navigation.
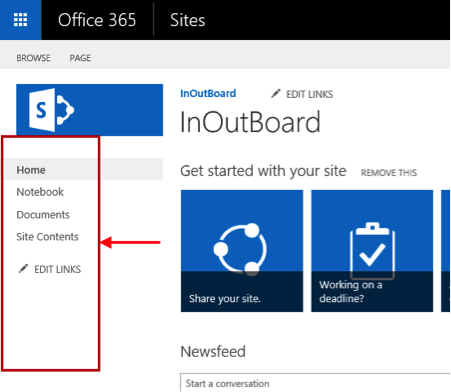
Left Navigation: The left navigation is, you guessed it, located on the “left” side of the SharePoint UI. It is also referred to as the Quick Launch. Many steps in the tutorial include the direction “Click the library on the Quick Launch and …”.
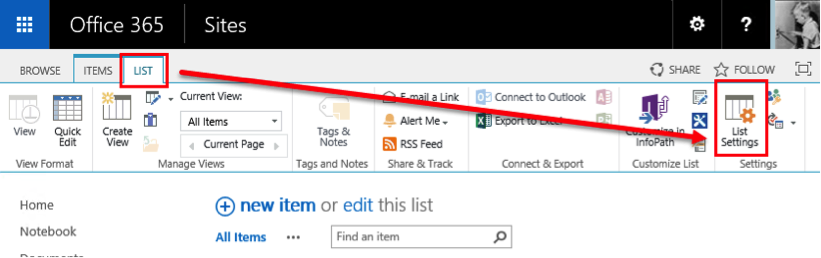
List Settings: You will be in the List settings page quite a bit throughout this tutorial as well as in your own SharePoint site. The List settings page contains organized links to pages that allow you to configure a SharePoint list. The List Settings button is located on the right-side of the ribbon of the List tab.
With the basics out of the way, let’s get started creating the lists used with the In & Out Board application. As I mentioned, there are two lists that will be used in this application. The first list that I will create is the IOBoard list. This is the list to which employees will log data, and it can also be used as a tracking list. To create the list, perform the following steps:
- Navigate to a SharePoint 2013 site. If you are going to use this application on an intranet, I would create the list at the home page level (root site).
- Click the Gear and choose Site Contents.
- On the Site Contents page, click Add an App and select Custom List. Type IOBoard for the list name and click Create.
- Click the new IOBoard list that was just created.
- On the IOBoard page, click the List tab in the ribbon, then click List Settings.
- In the Columns section of the page, click the Title column name.
- On the Settings > Edit Column page, select No for ‘Require that this column contains information’ and click OK.
EMPLOYEE NAME Column:
- Back on the IOBoard > Settings page, click Create Column.
- For Column Name, type EmployeeName.
- Select Person or Group for The type of information in this column.
- Select Yes for Require that this column contains information.
- Click the OK button to create the column.
- After the column is created, click the EmployeeName column name.
- Change the column name to Employee Name (with a space between the words)
- Click OK to save the change.
ENTRY DATE AND TIME Column:
- Back on the IOBoard > Settings page, click Create Column.
- For the Column Name, type EntryDateandTime.
- Select Date and Time for Type of information in this column.
- Select Yes for Require that this column contains information.
- Select Date & Time for Date and Time Format.
- Select Today’s Date for Default Value.
- Click the OK button to create the column.
- After the column is created, click the EntryDateandTime column name.
- Change the column name to Entry Date and Time (with a space between the words)
- Click OK to save the change.
IN or OUT Column:
- Back on the IOBoard > Settings page, click Create Column.
- For the Column Name, type InorOut.
- Select Choice (menu to choose from) for Type of information in this column.
- Select Yes for Require that this column contains information.
- In the Type each choice on a separate line: box, type In, press the ENTER key, and type Out.
- Select Radio Buttons for Display choices using.
- Select In for Default Value.
- Click the OK button to create the column.
- After the column is created, click the InorOut column name.
- Change the column name to In or Out (with a space between the words)
- Click OK to save the change.
COMMENT Column:
- Back on the IOBoard > Settings page, click Create Column.
- For the Column Name, type Comment.
- Select Single Line of Text for Type of information in this column.
- Select No for ‘Require that this column contains information.’
- Click the OK button to create the column.
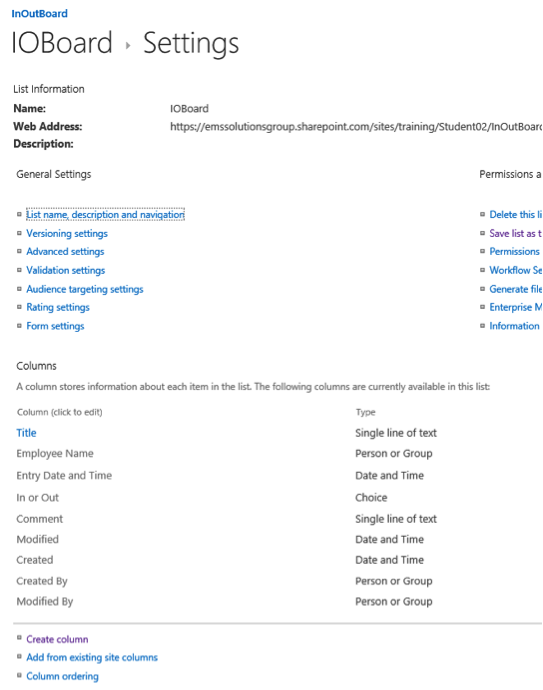
Your IOBoard list should look similar to the image below:
Now you will create the Employee Status list. This list contains a single entry for each employee. A new row will be created for an employee not already in the list. If the employee is already in the list, the workflow will just update the existing entry with new information. Use the steps below to create the Employee Status list.
- Click the Gear and choose Site Contents.
- On the Site Contents page, click Add an App and select Custom List. Type EmployeeStatus for the list name and click Create.
- Click the new EmployeeStatus list that was just created.
- On the EmployeeStatus page, click the List tab in the ribbon, then click List Settings.
- Click the List name, description and navigation link.
- Change the list name to Employee Status (with a space between the words).
- Click the Save button.
- In the Columns section of the page, click the Title column name.
- On the Settings > Edit Column page, select No for ‘Require that this column contains information’ and click OK.
EMPLOYEE NAME Column:
- Back on the Employee Status > Settings page, click Create Column.
- For Column Name, type EmployeeName.
- Select Person or Group for The type of information in this column.
- Select Yes for ‘Require that this column contains information.’
- Click the OK button to create the column.
- After the column is created, click the EmployeeName column name.
- Change the column name to Employee Name (with a space between the words)
- Click OK to save the change.
ENTRY DATE AND TIME Column:
- Back on the Employee Status > Settings page, click Create Column.
- For the Column Name, type EntryDateandTime.
- Select Date and Time for Type of information in this column.
- Select Yes for ‘Require that this column contains information.’
- Select Date & Time for Date and Time Format.
- Select Today’s Date for Default Value.
- Click the OK button to create the column.
- After the column is created, click the EntryDateandTime column name.
- Change the column name to Entry Date and Time (with a space between the words)
- Click OK to save the change.
IN or OUT Column:
- Back on the Employee Status > Settings page, click Create Column.
- For the Column Name, type InorOut.
- Select Choice (menu to choose from) for Type of information in this column.
- Select Yes for ‘Require that this column contains information.’
- In the Type each choice on a separate line: box, type In, press the ENTER key, and type Out.
- Select Radio Buttons for Display choices using.
- Select In for Default Value.
- Click the OK button to create the column.
- After the column is created, click the InorOut column name.
- Change the column name to In or Out (with a space between the words)
- Click OK to save the change.
COMMENT Column:
- Back on the Employee Status > Settings page, click Create Column.
- For the Column Name, type Comment.
- Select Single Line of Text for Type of information in this column.
- Select No for ‘Require that this column contains information.’
- Click the OK button to create the column.
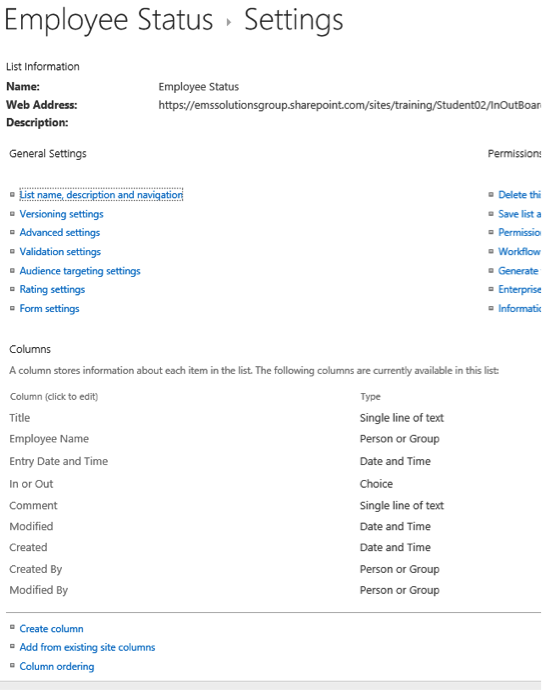
Your Employee Status list should look similar to the image below:
You should have now have the IOBoard and Employee Status lists. In the next article, we will create the workflow that will be used to update the Employee Status list each time a new entry is added to the IOBoard list.
Proceed to Part II.
Author: Eric Stepek, one of Accelebrate’s SharePoint instructors
In-Depth SharePoint Training
For in-depth SharePoint training, click here to view all of Accelebrate's SharePoint training courses for you and your staff.
Request Pricing
|

